Thursday, 31 December 2015

Finally...

The contractor finished the work on the Sunday before Christmas. The one thing that I was warned about but really couldn't appreciate was the amount of dust that the remodelling work would create. It is everywhere. It has even managed to get into closed drawers and boxes. I'm going to have to thoroughly clean every room and every item in the cottage. Spring cleaning has come early this year.

I am currently in the midst of filling up the new walk-in wardrobe. I'm using the opportunity to have a thorough sorting session. You know that saying - you wear 20% of your wardrobe 80% of the time - well, it is proving to be very accurate. I'm re-discovering some really nice items that I didn't know I owned!

It is time for me to make some tough decisions. Time to retire some old favourites, get rid of some gorgeous items that I've never actually worn or don't feel good and try some new looks with what I have left.  

Not long after we moved I dabbled with the 40 hanger wardrobe but it just didn't work for me. I dare not count the number of hangers that I have in use! The number is reducing. That is good enough for me. 

I'm also utilising a technique that I have read about. Each item is hung with the hanger facing me. As I wear an item the hanger will be reversed so that it is facing away from me. At the end of 2016 I'm going to see if there are any hangers still facing me. Those items may then be retired or sold depending on the condition of the article.

The next step is to re-organise the craft room. I've not been able to see the floor or table tops for months because it has been used to store everything that came out of the other rooms. I can't wait to get back to crafting. I've got so many projects in my mind at the moment that I am struggling to decide which one I will start first. I've also got some serious curtain and blind making ahead. 

I intend to keep the first project quite short. I hope to have a picture for you in a week or so. 


Sunday, 8 November 2015

Who knew a simple remodelling project would take this long?

The plan was to remove an internal wall to make two long and thin bedrooms into one lovely spacious room and add a 'walk-in' wardrobe to the Master Suite. We allocated a generous 8 weeks and thought it would all be done by the end of October - at the very latest. Wrong!

We are nearly there now. The only outstanding pieces are the fittings for the wardrobe. The problem is that until that is completed my craft room is acting as the storage room. Just entering the room is like encountering an obstacle course and this is why I've not been able to work on my projects and post about my progress. 

I've got serious crafting withdrawal symptoms. 


Wednesday, 12 August 2015


Step-by-Step padded embroidered wooden box


This is a DMC limited edition thread box in need of a pretty lid. It is supplied with a stitching pattern, a hardboard base for the stitching and a piece of perspex to protect the top. 

The problem was that I didn't like the design and my first attempt to stitch a lid failed because I didn't like that lid either! This time I had a different pattern in mind. I also wanted a padded lid rather than flat and topped by the perspex provided. 


First I made a paper pattern. I'm thinking about padding the interior of the box and so I measured the interior of the box and then I reduced each measurement by a few millimetres (the approximate depth of my padding and the covering material). I made a pattern for the top, bottom and the four sides. 


I used each paper pattern as a template. I then used tailor's chalk to draw around the paper pattern on the padding and my chosen fabric - green linen. When you are working with your chosen fabric don't forget to add a turning/hemming allowance. 

Next I cut the fabric and the padding to size.


Then I tacked my chosen fabric to the padding and began to position it inside the box ready for the glue.  


And here is the padded lid in position and ready to be glued.


I'm just deciding what embellishments that I am going to add...


Tuesday, 4 August 2015

Antique Printers Drawers in the Craft Room


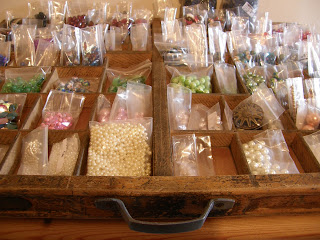
I've been fortunate enough to purchase two of these gorgeous printers drawers for my craft room. They are made of wood, quite shallow with lots of different sized compartments designed to hold the printers type. 

I've been told that references to 'upper case' for capitals and 'lower case' stem from the location of the drawers in which the letters could be found. I'm not sure if it is accurate but it makes sense and I like to think that it is correct.

You often see these drawers in craft rooms. They are frequently mounted on the walls and used to display little ornaments or cross stitch 'smalls' but I had other ideas.  

Regular readers will know that I've been using craftmates purple folders to store my smaller beads. I love this storage system for smaller items and limited collections. But my stash soon outgrew this storage solution.

I wanted something that would work for my whole stash and for beads of all shapes and sizes. Ideally something that would let me see at a glance what I have available for use and what would work together without having to open lots of different kinds of storage. 

I decided to use my two precious antique drawers for beads and to store them next to each other on the top of my apothecary style drawer unit to give me instant visibility of my stash. Now I don't waste any time searching my stash to see what would work together. I can see at a glance and spend the time creating! 


As I began to play around with my stash of beads I considered simply storing the loose beads in each compartment. I got the visibility that I wanted but it was really difficult to get the beads out. It just didn't work in practice. 

I needed something to store them in. Something that would not impede visibility and something that made it easy to pick up and tip out beads.

Of course I could leave them in the little resealable plastic bags that I already use but I really didn't like 'the look.'  Too messy! I wanted something that would fit into each compartment of the drawer. Something that would allow me to see how different shapes and colours worked together as well as something that I could just lift out and tip out the beads when I was ready.

Flushed with the success of my first cartonnage project, I decided to try again. This time my task was to make a series of different sized boxes to fit snuggly inside each existing compartment of each drawer. 


I am using exactly the same technique and the same white cardstock. I thought about using perspex or different coloured card but in the end I stuck with the white cardstock that I had already purchased. 


Progress is slow but I think it is worth the effort. I like 'the look' and so far it has given me everything that I was aiming for. 

This bead storage system has cost me very little and I love it!

I've even decided to add a finishing touch - a simple piece of perspex to form a transparent lid for each drawer to keep the dust out. 

I do love working in an organised space. 


Saturday, 25 July 2015

Step-by-Step Storage Solution for Thread Bobbins


You will need:


Card Stock
Pencil
Ruler
Glue
Bulldog clips or pegs 
Cutting board
Craft knife
Folding Tool (optional)


Measure Twice - cut once!


Make four cuts Shown as to form the ends of each tray

I scored and folded along the lines and then glued the ends in place. I then left the bulldog clips in place for a few minutes to help stick the pieces together.


And this is the finished article. 

I found this quick and easy to do and it gave me the result I needed without costing a fortune. 

Now I love using my DMC thread box!


Sunday, 19 July 2015


DMC Thread Box Solution for those of us who use Bobbins!


I've had my gorgeous wooden DMC thread box for a while now. As an item I love it and would never part with it but in practice I find it a real pain to use. 

For those of you who are unfamiliar with the box it is made of wood and features five drawers and a lift-up lid that reveals compartments of different sizes. Each drawer comes with vertical dividers that can be slotted into place. Each compartment is then the right size to hold skeins. All good - except that I don't keep my thread in skeins. 

I wind my thread onto cardboard bobbins and the width of each compartment is too narrow to hold two rows of bobbins but too large to hold just one. I started to put duplicates at the side but the bobbins had a tendency to move around. This is a real pain as I store them in numerical order. It also wasted huge amounts of precious space. What to do?


I thought about reverting to my original plastic boxes or the wooden boxes that I started to use in 2014 (see early posts) but it seemed such a shame not to use the DMC box for DMC threads. 

I decided to try my hand at simple cartonnage. 

After a few false starts I designed and made a simple tray from white cardboard. I made it a few millimetres shorter than the width of the drawer and just a few millimetres wider than each bobbin. Just enough to make it easy to get the bobbins in and out but tight enough to stop the bobbins from moving around. 


I found that I could now fit 9 trays in each drawer and 20+ bobbins in each tray. Suddenly, I had enough room to store my duplicate threads and some tools in the box too... 


I'll share my step-by-step guide to making this inexpensive storage solution next time.

Monday, 13 July 2015

Craft Room Storage 

Now anyone who is familiar with my Pinterest boards will know that I absolutely adore old library catalogue storage units, antique printer drawers and apothecary drawer units. 

I've now been fortunate enough to find something similar for my craft room. 

I recently purchased an antique pine drawer unit on a well known auction site. The drawer unit is quite narrow (only 30cm deep) and stands a little less than a metre tall. It has five rows of 4 drawers and originally featured little pine knobs on each drawer but I've now replaced them with old fashioned bronze cup handles with space for labels. 


I wanted the right look for the labels and so I had some fun searching for a free typewriter font. After a few false starts I found the one I liked and made some labels...


Would you like a sneak peek inside?!


Tuesday, 7 July 2015

Gorgeous Tree of Life 


This pattern has also been taken from Barbara Hammet's wonderful book on Elizabethan Cross Stitch. It is still my favourite book on cross stitch. 

If you don't have access to the book you'll be pleased to hear that large portions of it, including this gorgeous pattern, have been reproduced in well known cross stitch magazines. The Tree of Life featured in Issue 113 of the Cross Stitch Collection dated January 2005.

Tuesday, 30 June 2015

Elizabethan Cross Stitch pt4


This is the last one in the series.

I'm now on a hunt for something similar. 

Please let me know if you are aware of a pattern like this because I am keen to add more to this little collection. 

Tuesday, 23 June 2015

Elizabethan Cross Stitch pt3


This is the third one in the series.

There is one more to follow.

Tuesday, 16 June 2015

Elizabethan Cross Stitch pt2


Here is the second cross stitch in the series. I just adore the golden swirls, birds and bugs in this. 

Friday, 12 June 2015

Elizabethan Cross Stitch


This is the first in a series of patterns taken from one of my all time favourite books on cross stitch called Elizabethan Cross Stitch by Barbara Hammet.

More pictures in this series will follow soon. 

Monday, 4 May 2015

Rainforest Round


Here is a picture that took me many, many hours to complete. It is called Rainforest and it is stitched on 22 count cream Aida with DMC threads.


Friday, 24 April 2015

More Garden Birds


This is another pattern from 'The Country Diary Collection' entitled 'Wren and Hedge Sparrow.'


This is the third pattern that I've stitched from this collection. I shared the 'Willow Warbler Feeding Young' last year. 

I have a plan for all three and I hope to show you the finished article soon (wrist permitting). 


Sunday, 19 April 2015

White Throat and Nest


Here is another picture of my completed cross stitch. This one is taken from 'The Country Diary Collection' and stitched in DMC threads on Aida.

Friday, 10 April 2015

Two little cuties!


These little cuties have been taken from a pattern published by Textile Heritage for a Bluetit Bookmark.  

I've used them before but I love them so much I couldn't resist stitching them again. 

These two will form the front and back of a lavender sachet. I have a pile of dried lavender from the garden drying in the conservatory and just waiting to be used! 

Monday, 6 April 2015

Winter Wonderland


I stitched this little picture a while ago and I'd forgotten all about it until I uncovered a stash of completed stitching recently. 

It is entitled 'A Winter Wonderland'. It is part of a set of four designed by Julia de Medieros and it can be found in Cross Stitch Collection 99 (December 2003). I fell in love with the snow drops, berries and web. 

My other news is that I now have some good days with my wrist which means that I've just managed to finish the curtains for the lounge. I'm also thinking about my next project - my first Roman Blind. I'll be using my sewing machine for most of the stitching.

Sadly I've not been able to do any cross stitching yet.

Thursday, 19 February 2015

Injury

Gosh, has it really been this long since my last post? Apologies. 

The reason for my silence is that I've been diagnosed with an RSI injury to my right hand. Yes - I am right handed. 

The RSI (repetitive strain injury) means that I am unable to use my right hand without pain. It is proving to be a real problem because it means that I am struggling to work and perform day-to-day tasks let alone typing and sewing. 
My doctor has prescribed pain killers and I've been told to rest the hand. 

Sadly this has meant no sewing and no jewellery making for months now :0(. My craft room is sitting empty and my curtain making has gone on hold. It is intensely frustrating. 

I am currently considering resorting to machine sewing so that I can at least finish my curtains. Normally, I use a mix of hand sewing and machine sewing when I'm curtain making as I prefer hand finished edges.  

The good news is that I've found a stash of stitching that I've completed and never shown you so I'll be posting some pictures of that soon.