Sunday, 20 March 2016

Leisurely Sunday Morning

It was lovely to 'pad' downstairs for the morning 'hit' of caffeine to find two ducks on the wall patiently waiting for breakfast. 


A little bit later I shared the crumbs from the breakfast croissant with the garden birds. The offering is expected and it is usually the robin who gets there first.  


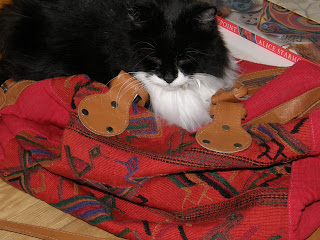
After breakfast I started to pack for a trip to London. Crossedpaws did his best to prevent me by sitting on my bag.


I'm not getting much time to sew at the moment but here is the update on my progress that I promised. I did all of this before I started my new job.  


I think it is going to be a while before I get some serious stitching time now. I've got a few days off over Easter but I'll be decorating and gardening...


Saturday, 5 March 2016

Sneak Peak - Morning Berries

I've just started stitching a sweet little pattern called 'Morning Berries' by LHN. I've tweaked the colour scheme - you know me by now, less blues and more pinks and reds. I also intend to add some more berries. 

Here's a sneak peak of my progress.


I'm using 32 count cream linen and DMC threads. 

I'm planning to make a stitching companion to carry stitching essentials when I'm travelling. 

Sadly I'm not getting much stitching time at the moment but I do hope to show you some more progress soon. 

Saturday, 27 February 2016

Furry Helper?!


Regular readers will know that I couldn't do very much stitching last year due to a hand injury. This year I am ignoring medical advice and stitching again. It hurts but it does bring other benefits. Stitching is good for the soul. I find it is the best way to unwind at the end of the day. 

It took CrossedPaws a while to get back into the routine. Now it is as though I never stopped stitching. He appears as soon as dinner is over and I sit down. He waits patiently whilst I get myself organised. He jumps up when I start stitching. 


As you can see he is really a bit too big to sit there - he usually ends up spilling over onto my lap! His weight means that the stand is very stable but I do worry that he will get stabbed by a needle. 

All is well unless the door goes or I've forgotten to put the TV remote by my side! 


Thursday, 18 February 2016

Little Felt Bag

Today I have a pretty little felt bag to show you. It is made of black felt with multicolour applique in felt on the front. I've blanket stitched the edges in vivid pink. 


A few years ago I did a google search for free cross stitch patterns. This was retrieved under the heading Traditional Chinese Cross Stitch. The pattern is called Chinese Wedding2. It is actually based on traditional Chinese art - papercut. This is what made me use it for applique.


I understand that the Mandarin Ducks are a symbol for a loving couple. I think they mate for life like Swans. 


Tuesday, 16 February 2016

Baby, It's cold outside

I woke up this morning to find hungry birds (nothing unusual there) and a frozen canal. 


As I looked out of the window the lead swan forced his way forward through the ice and made a little channel for his mate to follow him to the bank. 

As soon as the ducks saw me they flew to the bank to be fed. 


This is my favourite duck couple. They are invariably seen together. I'm told that they are quite old - see the colour of his beak? It is more blue than yellow. 

We call her the 'the lady with the bad leg' - see the way she is holding it? She limps quite badly and instantly recognisable. 

When I went outside to feed them I found another visitor at the gate. This is a lovely surprise. The geese usually prefer the grassy slopes that surround the local lakes. There is often a huge flock of geese in the local field. We often hear them flying over the house but they are infrequent visitors. 


Stay safe little ones!


Wednesday, 10 February 2016

Step-by-Step  Successful Stitching Every Time


Tip 1: Choose the pattern carefully
There is nothing worse than spending hours stitching something to find that you dislike the result. If you have doubts about a pattern or a colour scheme - don't be afraid to make changes! 

Go with your gut! 

The chances are that if you have doubts going in, you won't like the end result.

Tip 2: Choose the right material
You've chosen the pattern and accepted (or tweaked the colour scheme to your liking). How do you choose the right material?

Consider what are you making and your ability level. Are you going to sew on paper, plastic, aida, linen or other? Which do you prefer? What does the designer recommend? What 'look' are you after? 

Many cross stitch books helpfully show the same pattern on linen and aida, making the choice much easier. 

If you are trying a fabric for the first time, choose a small design! 

Tip 3: Make sure you have enough fabric
Make sure that the pattern fits comfortably on your fabric - don't forget to leave enough fabric around the pattern to permit edging and finishing.


There are free apps out there that do all of the hard work for you. Simply enter the fabric count (holes per inch) and the number of stitches required (most patterns will tell you the number of stitches required) and the app will calculate the amount of fabric you need for the pattern.

Tip 4: Position the pattern on the material
The easiest way to position the pattern on the fabric is to find the centre of the pattern and the centre of the fabric. 

Most patterns mark the centre of the pattern so that you can easily count out from the middle to the end of the stitching. Look for a little arrow or a triangle shown in the border or within the first row of the pattern at the top or bottom and the sides.

The easiest way to find the centre of the fabric, unless you are using paper, is to fold the material in half and then into quarters. Finger press the folds and then when you unfold the material you'll see the centre. 

Using the centre of the fabric and the centre of the pattern count out the number of stitches in each direction. This is really easy if you are using Aida because each square is equivalent to one stitch. It is a little harder with linens and other fabrics. I'll share some tricks in a later post. 

Count once, insert counting pin to mark the last stitch in the pattern in all directions. Then, count again! 

A counting pin is a blunt pin decorated with beads that is held in place with a little plug in the same way as some ear rings. If you don't have counting pins, use safety pins. Normal pins are likely to slip out. 

Tip 5: Avoid fraying edges
Stop the edges of linen and aida from fraying by machine stitching around the edge or blanket stitching by hand. It is a bit of a chore but it ensures a good strong edge that can withstand handling and washing. 

I prefer to hand stitch using a cotton that is the same colour as the fabric. On high count fabrics I blanket stitch over two squares rather than one. It is almost invisible when done and well worth the effort. 

Tip 6: Organise your thread
Make sure that you have the coloured threads that you need and the right size needle. 

Get your threads organised and ready on numbered bobbins or a thread organiser. This is especially important if you are using a number of similar shades or creating colours by mixing different coloured threads together. 

It is really easy to pick up the wrong coloured thread when you are working with similar shades in artificial light. You may not spot an error until the morning. Such errors are really frustrating. They also waste precious stitching time and costly silks. 

You can buy thread organisers in all materials, shapes and sizes or you can make them.  

One of the easiest and quickest ways to make a thread organiser is to take a strip of card and make holes in the card. Make one hole for each colour. Put the thread through the hole and draw the symbol that the pattern uses for the colour next to the hole. Errors are now much less likely! 

Tip 7: Enjoy your stitching. 
Start stitching in the centre and work outwards. 

Don't start your sewing with a knot. Master the loop start. See earlier Step-by-Step post on keeping the back of your sewing neat for instructions on how to do this.

Stitching is good for the soul. 

It should be relaxing and it can be really therapeutic at the end of a difficult day. 

The moment that you begin to make more errors than correct stitches or you find yourself getting annoyed with threads that keep tangling, take a break. 

Enjoy your stitching. Don't make it into a chore!


Sunday, 7 February 2016

Finished - Home Of A Needleworker Too


Here is a picture of the finished pattern (with my tweaks). 

I adore the pattern and I'm really pleased with it. 

I used DMC threads and I incorporated more red than the recommended blue - the swirls under the wording. I also stitched the top and bottom pattern in dark green rather than brown. 

I didn't intend to make any other changes but as I was stitching I tweaked the 'H' slightly and made the little house with the red door. I also changed the front door of the big house to make all of the windows more prominent. 


Friday, 5 February 2016

Step-by-Step How To Keep The Back Of Your Stitching Neat


Don't underestimate the importance of keeping the back of your stitching neat and tidy. No knots. No long expanses of thread between stitches or colour changes. No mess!

I'm using my current stitching project to provide some tips and to demonstrate the technique.  


Tip 1 Loop Start - No Knots 
Here's how to start stitching without using a knot in four easy steps. 
(1) Take a length of silk and fold it in half. 
(2) Thread the two ends (not the looped end) through the eye of the needle. 
(3) Bring the needle up from the back of the fabric to the front. Make sure you leave the looped end at the back. 
(4) Take the needle down from the front of the fabric to the back and through the loop of silk. Pull tight.
Continue stitching normally.


Tip 2 Form Each Stitch Consistently 
Don't create each cross stitch individually. Stitch a row of half crosses in one direction and then complete the crosses by stitching in the other direction. Ensure all of the top stitching in your work is consistent and slants the same way. Be very careful if you are rotating the fabric in a frame. Take it from me - it is very easy to get it wrong and end up with an embroidery in two halves with each half slanting the opposite way. 


Tip 3 Thread Length 
Don't be tempted to leave the thread too long thinking it will save time. It will get twisted and knotted as you stitch. It is frustrating and annoying and it will slow you down. If you find your thread is getting twisted as you stitch let the needle hang down until it stops spinning. Now you can safely start stitching again. 

Tip 4 Check The Back Of Your Work Frequently
Check the back of your work regularly as you stitch to ensure that the thread has not become knotted or loose. If you spot a problem - go back and resolve it. It is horrible to have to unpick stitches but it is worth it in the end.

Tip 5 Ending - No Knots 
Take the needle from the front of the fabric to the back as usual and then take the needle through the backs of three stitches before neatly cutting off the end as close to the last stitch as you can. I've found three to be the magic number. It looks neat and it holds the thread in place securely. 


Practice on projects when the back of your stitching will not be seen. Practice until keeping your stitching neat becomes second nature. Practice until it comes naturally and you don't have to think about it. In this way you'll remove the stress from stitching projects where the back of your stitching will remain visible.

Wednesday, 3 February 2016

More Work in Progress - Home Of A Needleworker Too


Here are two more images of my work showing some slight tweaks to the pattern. 

I just adore the little house with the red door!


Monday, 1 February 2016

Work in Progress - Home of a Needleworker Too 

I'm using DMC threads and 14 count Aida for durability. I've tweaked the recommended colour scheme to add more red and green. 

It is really easy sewing and I hope to have it completed very quickly. 


I'll share my progress again later in the week.

Sunday, 24 January 2016

Preparing To Stitch

I'm just getting ready to start a bigger cross stitching project. The plan is to embroider something that I can use to cover the top of a footstool. The stool has two drawers which I am going to use to store some small stitching accessories. 

I wanted a pattern that would allow me to pick out and use some of the motifs on needlework accessories.

I must admit that I've struggled to find the right pattern. I'm spoilt for choice as I have a huge stash of patterns. I've spent hours pondering. I'd go to bed confident that I had decided, only to change my mind in the morning! 

Eventually, I narrowed it down to two - a shaker set of box lid, pin cushion, scissor keep and needle book shown in Just Cross Stitch a while ago and an LHN pattern I've had for a couple of years called 'Home of A Needleworker Too.' It was a tough decision but I went with the LHN pattern. 

I've chosen cream Aida for this project as it is sturdier than linen. 

I've blanket stitched the edges to stop it fraying. Here it is clipped to my lap frame. 


You might recognise my needle case and bobbin holder in the picture from earlier posts. I'm using DMC threads and I've tweaked the colour scheme slightly. I wanted more reds and greens and less brown and blue. 

I'll be stitching the pattern without further amendment.

I'll share my progress with you in a few weeks.


Saturday, 23 January 2016

My First Triple Pleat Curtains

This month I've been working on the curtains for the new bedroom. 

I think I visited every fabric shop in the vicinity before I finally found a fabric that I liked in the right colours. I've chosen some silky woven fabric with a pattern of trees in brown and blue. 

Whilst out fabric hunting I saw some curtains with a triple pleat heading in one of the fabric shops. The heading had been accentuated with a contrasting covered button below each set of pleats. I adored them. 

Now I've made curtains in the past but I normally stick to pencil pleat. This time I decided to be a bit more daring. 

I began to experiment making those triple pleats. The options were to make the pleats manually or to use a specialist heading tape and pins. I went for the latter. 


Normally I stitch the pencil pleat heading tape close to the top of the curtain. I found out the hard way that you have to leave more space below the top of the curtain when using the triple pleat tape... If you don't leave enough the top of the pins shows when the curtain is hanging. This happened to me and it was not a good look. I spent an hour or so unpicking stitching on my first curtain and started again. I won't make that mistake again!

In addition to the triple pleat header tape I used thermal, black out lining for the first time. The black out lining really works but I found it very heavy and unpleasant to work with - especially on the double width curtains. 

I normally let curtains hang a while before I hem the bottom. In this case I'm also using my favourite craft clips to train the triple pleats to hold together and hang nicely. 

When I take them down to hem I plan to add some embellishment to each triple pleat. Meantime, here is a picture of one of the newly made curtains.


Here is a closer view of those pleats.


Thursday, 21 January 2016

Lavender Sachet


This gorgeous fellow was stitched from a magazine pattern call 'Birds of Beauty' designed by Lesley Teare. It is part of a series for a coaster, notebook and bookmark shown in Cross Stitch Crazy issue 166. 

This is the pattern for the coaster.

I substituted some metallic threads and added the design on the back and the bead edging. 

Do you like him?