Wednesday 12 August 2015


Step-by-Step padded embroidered wooden box


This is a DMC limited edition thread box in need of a pretty lid. It is supplied with a stitching pattern, a hardboard base for the stitching and a piece of perspex to protect the top. 

The problem was that I didn't like the design and my first attempt to stitch a lid failed because I didn't like that lid either! This time I had a different pattern in mind. I also wanted a padded lid rather than flat and topped by the perspex provided. 


First I made a paper pattern. I'm thinking about padding the interior of the box and so I measured the interior of the box and then I reduced each measurement by a few millimetres (the approximate depth of my padding and the covering material). I made a pattern for the top, bottom and the four sides. 


I used each paper pattern as a template. I then used tailor's chalk to draw around the paper pattern on the padding and my chosen fabric - green linen. When you are working with your chosen fabric don't forget to add a turning/hemming allowance. 

Next I cut the fabric and the padding to size.


Then I tacked my chosen fabric to the padding and began to position it inside the box ready for the glue.  


And here is the padded lid in position and ready to be glued.


I'm just deciding what embellishments that I am going to add...


Tuesday 4 August 2015

Antique Printers Drawers in the Craft Room


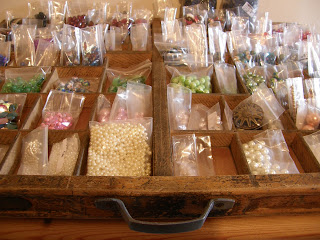
I've been fortunate enough to purchase two of these gorgeous printers drawers for my craft room. They are made of wood, quite shallow with lots of different sized compartments designed to hold the printers type. 

I've been told that references to 'upper case' for capitals and 'lower case' stem from the location of the drawers in which the letters could be found. I'm not sure if it is accurate but it makes sense and I like to think that it is correct.

You often see these drawers in craft rooms. They are frequently mounted on the walls and used to display little ornaments or cross stitch 'smalls' but I had other ideas.  

Regular readers will know that I've been using craftmates purple folders to store my smaller beads. I love this storage system for smaller items and limited collections. But my stash soon outgrew this storage solution.

I wanted something that would work for my whole stash and for beads of all shapes and sizes. Ideally something that would let me see at a glance what I have available for use and what would work together without having to open lots of different kinds of storage. 

I decided to use my two precious antique drawers for beads and to store them next to each other on the top of my apothecary style drawer unit to give me instant visibility of my stash. Now I don't waste any time searching my stash to see what would work together. I can see at a glance and spend the time creating! 


As I began to play around with my stash of beads I considered simply storing the loose beads in each compartment. I got the visibility that I wanted but it was really difficult to get the beads out. It just didn't work in practice. 

I needed something to store them in. Something that would not impede visibility and something that made it easy to pick up and tip out beads.

Of course I could leave them in the little resealable plastic bags that I already use but I really didn't like 'the look.'  Too messy! I wanted something that would fit into each compartment of the drawer. Something that would allow me to see how different shapes and colours worked together as well as something that I could just lift out and tip out the beads when I was ready.

Flushed with the success of my first cartonnage project, I decided to try again. This time my task was to make a series of different sized boxes to fit snuggly inside each existing compartment of each drawer. 


I am using exactly the same technique and the same white cardstock. I thought about using perspex or different coloured card but in the end I stuck with the white cardstock that I had already purchased. 


Progress is slow but I think it is worth the effort. I like 'the look' and so far it has given me everything that I was aiming for. 

This bead storage system has cost me very little and I love it!

I've even decided to add a finishing touch - a simple piece of perspex to form a transparent lid for each drawer to keep the dust out. 

I do love working in an organised space.