Monday 3 November 2014

Beading Madness

I've been reading about the '40 hanger closet' and I've decided to give it go! Now I love clothes. To say that I have too many clothes is an understatement. Pre-move I had more than three double wardrobes cram packed with clothes. I buy classic styles and I look after them and now I have enough suits to wear a new one each day for a month. Add to that blouses, jumpers, casual wear, evening wear etc. and the closets are soon full! 

Post-move I have only one double wardrobe available....:0(

I've looked at each item as I've been unpacking to decide whether it has a place in my new regime. I've tried things on to check what fits nicely and to decide what 'feels' good on. It has been particularly hard to decide what to do with my favourite items. What is it that they say? 20% of your clothes get worn 80% of the time! It is so true! 

In the midst of this activity I rediscovered this evening dress. It is a beautiful dress but the silk is looking very sad in places. It wasn't in a condition to sell or give to charity.


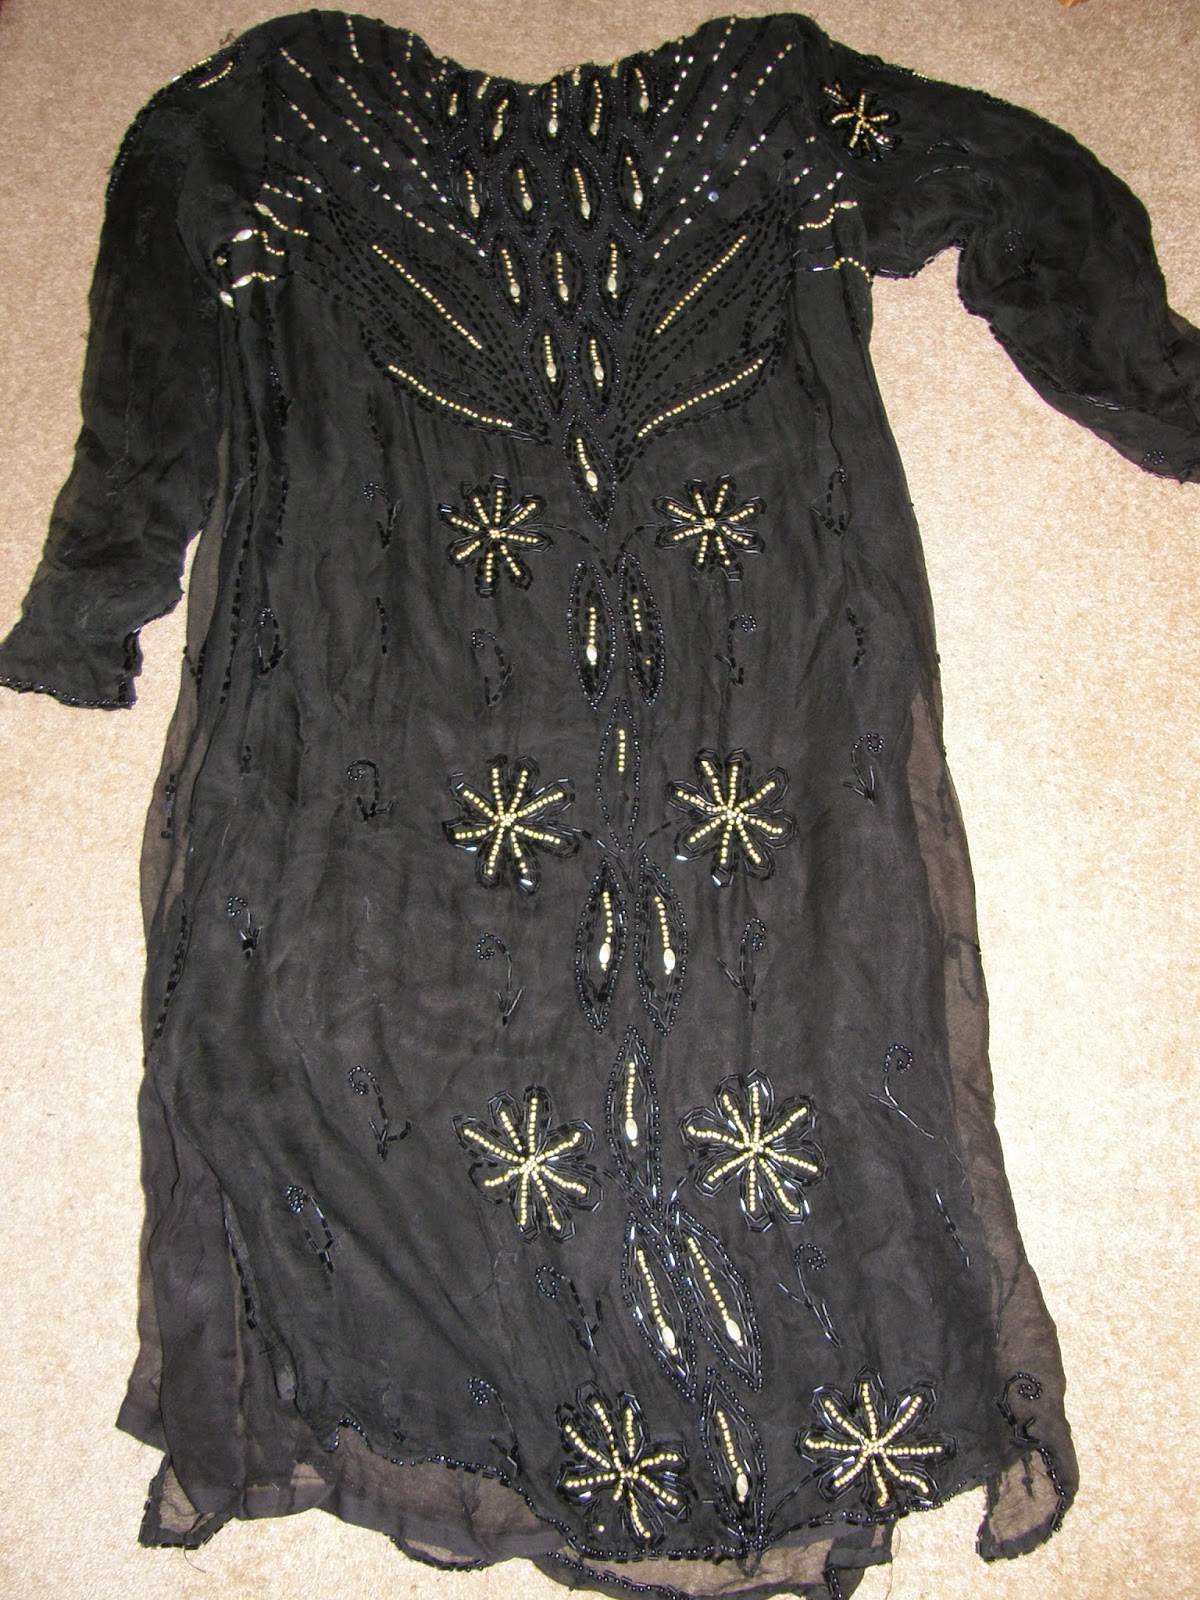
It just seemed such a waste to throw away all of those beads so before I retired it, I thought I'd harvest the beads for future use. Little did I know that it would take me eight long evenings to remove them! 


 Now I have a large tub of black, gold and pearl beads available for my next beading project.

Thursday 30 October 2014

Free Craft Storage

Recently, I rescued this empty can of nuts from the recycling box. I thought that it was a nice size for craft storage. It even had a transparent plastic lid.


Now I'm not the sort of person that could just use it 'as is.' I wanted to remove the print but how? I tried a variety of products and methods without much success.

I thought about covering it with paper or fabric but I liked the plain silver as it fits with some of my existing craft storage boxes. 

I became obsessed with how to remove the print from the can. After a bit more trial and error I found that the print comes off when it is rubbed with an old fashioned wire scouring pad. It takes about ten minutes to completely remove the print from the can. The longest and most difficult bit is the lip below the lid. Underneath the tin is silver and gorgeous!

I already have three new storage containers for the craft room. The great thing is that the lids have an overlap which means that the cans can be securely stacked on top of one another. 

There's another flavour which comes with a red top. This picks up the Poppy theme in the craft room!


Now I  just have to eat more nuts and design some labels!

Wednesday 29 October 2014

Successful Pattern Matching

The plan was to retire our existing lounge furniture and to buy new. As is often the way when I go shopping for a particular something, I came back empty handed. You'd think I'd have learnt this by now! 
Thus, the sofas have to stay! 

The backup plan was to make some new curtains and scatter cushions. But the backup plan failed too! 

When, oh when, did furnishing fabric become so expensive and so boring! The local shops are filled with furnishing fabrics in duck egg blue and greys but I want bright colours... I found a few embroidered fabrics that I quite liked with a bit of colour but they were really expensive. Plus, I need a lot of fabric as the curtains have to cover two sets of patio doors and a window. I really didn't want to pay so much for something that was okay, but not great. Especially, as we still want to replace the sofas in the future which is likely to trigger a need for new curtains.

What to do? Answer: make the best of what you've got. So, I've spent the last few weeks taking apart my old curtains to scrape together enough fabric to make the curtains that I now need. 


I thought about adding a panel of contrasting fabric to each curtain to make up the length but it is not a look that I like. 

I began to experiment with pattern matching. The pattern had to match along the join but it also had to match where the curtains meet in the middle....


After hours of work, I'm very nearly there! I'll have to live with some joins that I prefer weren't there but that is better than having no curtains at the windows. 


I've found the trick to success in pattern matching is patience. Firstly, iron both pieces. Secondly, match the pattern on both pieces. Thirdly, iron both pieces again along the join line. Fourthly, pin and tack both pieces together. Finally, check the line and sew the seam. Done!


Tuesday 21 October 2014

Heron!

The thing that really attracted us to our new home is that it is by water. We hoped that we'd be visited by ducks and other waterfowl but we never thought that our nearest neighbour would be a Heron. 


CrossedPaws has not noticed the Heron outside the window yet! 


Close-up of the Heron outside the gate.


Here's the Heron outside the study window!


This is a close-up of the Heron through the window. 

Monday 20 October 2014

Progress To Date

Here is what my craft room looks like today. It is far from finished but it is now in a state that will allow me to start some of my stitching and home furnishing projects. 


I also need to find some smart storage solutions that don't cost a fortune. During the move I've discovered crafting supplies that were stashed in the loft and long since forgotten.... they include items for lace making, glass engraving and a kit to make an embroidered waistcoat still in the original packaging. The sad thing is that I won't be making this as hubby doesn't wear waistcoats these days!

Wednesday 15 October 2014

Furnishing My Craft Room For Free

Regular readers will know that I had a round white table, a dressing table, some low shelf units, some high shelf units and some CD storage available to me. Here's how I used them to furnish my craft room.

I decided to put the table and chairs in front of the window. The natural light and the view is simply too nice to ignore but I am going to have to make a window treatment to keep the sun light from blinding me! I've not had this 'problem' before!

I put the lower shelf units on the wall facing the door. So far, so good! 


I considered using the dressing table as extra working space. This would allow me to leave projects out and still have space to use the laptop or the sewing machine on the table. I've never had this luxury before. 


Also, the fact that I can close the door means that CrossedPaws himself is denied the fun of knocking everything on the tabletop to the ground. I know he is cute but he is a terror too!


In the end I discarded the dressing table and opted for the tall book cases. I settled for three along the wall behind the door. I added brass lights to the top and some matching brass handles to the cupboard to tie it all in, because I already had them and because I could! Now, for the first time ever, all of my craft patterns, books and materials are all in one room. The picture below shows a shelf of my favourite and most used craft books.  


Finally, I put doors on the second low unit and filled the dog leg by the window with a tall corner shelf unit and the CD storage. The great thing about this is that the corner unit holds loads and is an arm's reach away, yet it is completely invisible from the door! 

I have a plan for the CD storage but I'm not going to share it with you yet. 

I'm pleased with the lay out. The floor space has even allowed me to remove my exercise machine from the main bedroom because it fits comfortably in front of the tall shelves. Now I can work out whilst the glue is drying!

I didn't want a television in here but I've sacrificed a shelf to my favourite music system. 

It is going to be very hard to leave this room!

The great thing about this room is that I've furnished it with furniture and fittings that I have and so I can spend my money on craft materials and much needed storage.  


Tuesday 14 October 2014

My Craft Room


Now I'll admit I've always been very envious of bloggers with their own craft rooms and I still can't quite believe that I now have my own. It isn't the largest of rooms but it is all mine! It is long and thin with a dog leg in the far corner by the window.


The room is south facing, looking out over the garden and full of sun light. I've inherited pale yellow walls with accents of red (provided by a somewhat dated border of poppies and matching curtains), pale green carpet, wooden door, wooden skirting boards and a wooden window frame. I don't have the time to decorate yet and so I've just cleaned it thoroughly. 

I'm going to furnish the room with the furniture that I have. I'm not allowing myself to buy anything until we've been in the house for a few months. 

Here is the furniture that I have left to play with - a round white table, a white dressing table, some old chairs that have been in the garage for years (they will need new covers), three tall bookcases and a corner unit, two tall CD racks and two low cupboards. 

I'll show you what I did with it all soon!


Monday 13 October 2014

Picture Problems

Apologies, I've received an email telling me that some of my pictures are not showing correctly in archived posts. Sadly, this has proved to be correct. Curiously, the same pictures are shown perfectly on my related Pinterest page. 

I've tried everything that I've been recommended to do to correct the problem but nothing is working. I'm stumped! I've done nothing different at my end and all of the missing photos show clearly in the record of posts.

If any reader has experienced this problem before and can tell me how to cure it, I'd be very, very grateful. 


Friday 10 October 2014

Making it up as I go


Now I think I've mentioned that we'd only seen the interior of the house once before we bought it - meaning that I did not have the luxury of measuring the rooms and planning where to put the furniture before moving day. 

All of this means that I've developed a new skill - I call it dancing with furniture. The objective of the dance is to find the room lay out that allows us to use the room in the manner that we've planned. Why don't I use a paper plan? Because believe it or not, with the furniture piled in the centre of each room by the movers, it was actually easier to just move it into position until I found a lay out that works and that I like from all viewpoints. 

Downstairs is mainly open plan and was pretty easy to sort with large rooms and plenty of windows. The only real restriction is the traffic flow to the doors, stairs, conservatory etc. 


Upstairs is very different. The cottage is two hundred years old and it has been extended at least three times. The upstairs rooms are very long and narrow which means that they are awkward to furnish. 

Oh how I missed access to my online design resources! Sadly, by this time we'd had the land line connected but the broadband was less than a quarter of the capacity that we'd had before and nigh on impossible for us both to use together. Time to order fibre! But fibre was not going to be available in the village for a while....

So now, it is a few weeks later, we have fibre and I'm an expert in dealing with narrow rooms! 

Thursday 9 October 2014

New Home

It has been some time since I've had the opportunity to write here. These pictures show a very small proportion of the bags and boxes that I've been unpacking.


We fell in love with the new house for many reasons. It is a two hundred year old cottage by water and one of the few heritage houses in the area. It is also located in a small village that was listed in the Doomsday Book. 

It is truly a different world from our old house, purchased new, from a builder on a modern estate. But the old house was my home for twenty years. In that time I'd had the garden landscaped, chosen the colour schemes for each room, painted and made all of the curtains, purchased furniture for the house, replaced the kitchen, bathroom and cloakroom etc. 

After less than two weeks in the new house I was very pleased to have only two rooms left to unpack - the craft room and the guest room. But then things started to go wrong! 

We had a flood. I was relaxing in the sitting room after a long day of unpacking when I noticed a dark stain on the ceiling. I was certain that it had not been there in the morning. I was right. After some investigation we found that the shower in the en-suite was leaking. I was really worried because plumbing is not my thing and the stain was right above the ceiling light. I had visions of the ceiling falling down and the electrics blowing up! Early the following morning I was on the phone to a contractor that I have used in the past but he was the other end of the country on holiday! Worse than that the guys that he recommended were not picking up the phone.... after a phone marathon, I found a contractor in our new village who was able to come that day. The expense was unplanned but the problem was resolved. I went to bed breathing a big sigh of relief. 

Then we realised that the main drain was partially blocked. Another contractor, another unexpectedly large bill!

Then the flush on the toilet in the en-suite stopped working. Another contractor visit and another bill all in the space of the first month!

By this time, I was worried we'd bought a money pit for a house! We knew there would be issues with such an old house but we didn't expect all of these issues in the first few weeks....Thankfully, things settled down and I managed to get back to the unpacking.


Thursday 7 August 2014

New Home

I'm back!

We moved into our new home last Thursday evening. 

As with any home move there was some sadness leaving a house that we had made into a home and lived in for many years; some drama - furniture not fitting through doors and having to be disassembled and some excitement about the new house. 

We finished packing late on Wednesday evening and the removal company arrived a little late at 9:30 on Thursday morning to take us to our new home. It then took far longer to pack up the van than we had anticipated and so the furniture didn't leave until after 4pm in the afternoon. It was another hour or so before I had finished hoovering and washing floors and I left the house for the final time. Fortunately, the new owner was not moving in the same day!

It was after 8pm when the removal company finally left us and the furniture and a plethora of boxes in the new house. 

Unfortunately I'd only seen the house interior once before the purchase completed. This meant that I did not have the opportunity to measure furniture and plan where it should go in each room. 

Somewhat inevitably we found that the two double mirror wardrobes that we had along one wall in our old home didn't fit the alcove in the new bedroom and had to be split between two bedrooms!

I'd asked the removal company to put each item of furniture roughly in the middle of each room so that I could do some cleaning before moving the furniture into position. 

By the end of Monday I had cleaned every room and the furniture in place but the house was an obstacle course of boxes. 

Today, I am left with two rooms (including my craft room) to unpack. Everything else has been unpacked and put away.

I'll share some photos soon! 


Thursday 24 July 2014

Life's Roller Coaster Strikes Again!

Apologies for running silent for the last few weeks. Regular readers will be aware that it has been, shall we say, a challenging year to date! Now things have changed again but this time in a really good way. 

Earlier this year my husband and I fell in love with a house that was for sale. A friend was in the midst of buying her first house and we clicked on Rightmove to see the house that she was so excited about. We weren't looking to move. It simply wasn't the right time for us. Then we saw it! 5 months later and we have just exchanged contracts. We move in at the end of this month.

The new house is truly our dream house with gorgeous views of the water. It is just the right size, neither too small nor too large. It is in a prime location and our nearest neighbour is a Heron who stands and fishes literally just outside the garden gate. 

The other bonus is that I will finally get to have my very own craft room! 

All this means that I'm not sewing at the moment. I'm too busy turning our current house into an obstacle course of boxes and wishing that we hadn't accumulated quite so much stuff over the years! I swear it breeds.

It also means that I will be offline for a few weeks because we've just been advised that we will have to wait ten days after the move to get back on line...

I still plan to sew and to share my stitching progress but I think I'll be making soft furnishings for quite a while. There are so many new windows that require curtains, tie backs and/or blinds. There are also colour schemes to design, chairs to upholster and cushions to make. It is all so exciting! 

I still plan to start my stitch book and stitch tutorials but my giant CHS Village cross stitch may be on the back burner for a bit!

I promise I'll share some photos in August!


Friday 4 July 2014

Does anybody else do this?

The moment I start stitching a project my head moves onto my next stitching project. It doesn't matter how much I've been looking forward to starting a project or how much I love the design. 

I'm stitching yet I can't wait to start my next creation. 

It is sooo annoying! 

Why do I do this? 

More importantly, how do I stop?

Wednesday 2 July 2014

Variegated Bookmark

I am no technophobe  I just like the look and feel of real books. My home is full of books and a pretty bookmark makes reading even more pleasurable. 

This stitching project was a departure for me as I used an Anchor thread instead of my usual DMC. The Anchor thread was an impulse buy. I just couldn't resist the colourful thread when I saw it in my local hobby store.

I believe this pattern is a web freebie but I've had it a while and I am ashamed to say that I can't remember where it came from, whomsoever you are, thank you! If you stumble across this page, please forgive me for my shoddy record keeping. 

I hope you like my bookmark and handmade tassel!


Friday 27 June 2014

Bear Sewing Tools

I've just finished making the sewing tools to match my new Bear Sewing Set and I am keen to share them with you! 


I've made two stitch markers with semi-precious gem beads that pick up the colours in my sewing plus a bear charm which I've painted brown with enamel paint. 


I've also made a matching laying tool and hook tool. The tools are conveniently joined by a chain. The laying tool helps to ensure that the top stitch in each cross lies flat. The hook is something that I use for all sorts of things - catching loose threads, tightening threads, pushing stuffing into awkward shapes and corners etc. 


I've added a long chain, bear charm and a tiny heart clasp to the smallest magnetic needle rest so that it can be attached to my sewing bag or magnetic pattern board. 


I've also added a shorter chain, beads and bear charm to the bigger magnetic needle rest. 


Lastly, I came across this gorgeous carved bear in agate on Ebay and I just had to have him. I've been waiting for him to arrive for a month! I've simply added some semi-precious agate beads and a lobster clasp so this fellow can act as a scissor fob, bag charm or weight for splitting threads or twisting cords! 


Wednesday 25 June 2014

New Goals and Objectives

I recently saw an extract from a series of patterns by Carriage House Samplers called Hawk Run Hollow. About the same time I saw a picture of a huge cross stitch made from various Little House Needlework patterns. So now I've decided to do the same with the Hawk Run Hollow series. There are twelve houses in the pattern called Houses of Hawk Run Hollow and twelve more pictures in the pattern called Village of Hawk Run Hollow. This should keep me out of mischief for quite a while! When I need a break from this I can do a bit on the Hummingbird Afghan. 

I've also set myself a target to teach myself 30 new embroidery stitches in the next three months. I'll be sharing my stitching progress and what I've learnt with you as I go. This will motivate me to continue and it will give the reader the ability to correct my technique!

I'd like to keep a record of my progress in some sort of stitch book. Maybe something like the old fashioned button book that is pictured on my Pinterest Board but with stitches instead of buttons! I am still thinking about the best way to do this. Please let me know if you have created a Stitch Book and how you did it. I'd love to see a picture.

All of this is a precursor to my stitching resolutions for 2015: 

(1) Learn some more stitches;
(2) Attempt some (simple) stumpwork; and,
(3) Try quilting for the first time. 


Tuesday 24 June 2014

Bear Finishes


This is a picture of the full bear set - Sewing Bag, Thimble Purse, Pin Cushion, Case for Sewing Tools (I'll be making these next) and two Magnetic Needle Rests. This is the first time that I've finished each piece as I go instead of leaving all of the finishing to the end. It didn't stop me hating the chore but at least it broke up the chore!


Monday 23 June 2014

Bear Bag

Regular readers will know that I've been making some stitching accessories substantially based on an LHN pattern called 'Bear Tree Forest.' I loved the bears, birds, squirrels and the forest but I wasn't too keen on the little house and snowman that made up much of the left hand side of the pattern. 

I've got a picture of a bag for bobbins hanging from a work lamp on my Pinterest board called 'Inspiration.' I decided to make something similar and retire my highland cow accessories (now sold for charity). 

I decided to make a shallow embroidered bag to hang from my floor standing embroidery frame. It will hold my magnetic pattern board, bobbins, thimble purse, pin cushion etc. 


For the front of the bag I omitted the house and added a tree lined hillside, snow and more bears. I also made some other tweaks!


For the back I used the same extract from the LHN 'Woodland Sampler' pattern that I stitched on the purse.


I lined the bag with the same sage green linen and added a hand made label as a finishing touch.


Finally, I stitched some little trees to the base of the handles and lined them with the same sage green linen.


Thursday 19 June 2014

Stag Snipper holder and Needle Rest  


This gorgeous fellow is taken from a Textile Heritage kit. He used to hang from my floor standing frame and hold snippers and act as a Needle Rest. It is currently for sale to raise money for my favourite charity. 


Confession 

I tweak cross stitch patterns! I may add an extra sheep, change the colours or in the latest example miss out a twee house and snowman that has no place in a bear forest but I don't do it to cause offence. If I didn't like the pattern I wouldn't buy it and I certainly wouldn't spend hours stitching it... I also always give credit to the designer for their work.

It got me thinking. Which is worse? Designing a pattern that no one buys or designing a pattern that people love and buy but change in some way?! I like to think the former but then I haven't published a pattern ... yet. 

I think it is time that I gave something back. Over the years I've collected many free cross stitch patterns from the web. I have an idea for a freebie collection. It'll be a while but I hope to publish later in the year.

Wednesday 18 June 2014

Bear Thimble Purse

Those of you who look at my Pinterest board 'Inspiration' will know that I have been inspired by patterns for thimble purses and the purses pictured on Yumikuhiguchi's blog. 

I decided to have a go at making an embroidered purse myself using a metal purse frame. When I'm using my cross stitching in a different way I'm always worried about getting it wrong and not being able to salvage my cross stitching. I looked at various purse making tutorials on line. The scariest thing was not having a pattern to match my frame. Unless you buy a kit you have to make it up as you go along and I've never used a metal purse frame before. I probably should have used fabric first and then my embroidery, but I didn't!

It took me a while to decide whether to use a frame in which you glue your work or a frame to which you stitch your work. In the end I decided to use a 'glue in' frame because I liked the invisible join of fabric and metal.

I bought two new gold coloured 6.5cm purse frames in an ebay auction for less than £2! I already had my favourite UHU fabric glue in my sewing tools. The rest was trial and error and guess work!

I embroidered the front of the purse with a small bear, snow and two different types of tree from LHN 'Bear Tree Forest'. 


For the back I chose part of an LHN design called 'Woodland Sampler.' It fits well with my Trees and Cardinal set and the Bears as it features a fir tree branch a Cardinal, Squirrel and Rabbit with snowflakes.


I 'squared off' the corners and lined the inside with the same sage green linen that I've used before. I added a handmade label as a finishing touch. 


This is a first for me! I've learnt a lot and there are a few things that I would do differently but overall, I am very pleased with the result. It can comfortably fit my thimble, my gold stork scissors, my beeswax, Needle Case, Handmade Needle Threader and Magnetic Needle Rests. 

Monday 16 June 2014

Bear Pin Cushion

I wanted to make a large pin cushion and so this time I stitched a big bear and two snow laden trees on a ground of snow. 


It is backed with the same sage green linen as the needle case. I was going to leave the sides plain but now I've made it I am thinking about adding some decoration! I'm just not sure yet. 

I'll have a think while I work on the next Bear accessory. 

Wednesday 11 June 2014

Bear Case for Sewing Tools


For the front, I stitched a small bear and three trees on a ground full of snow.


The closure is a gem bead and a hand sewn loop.

The back features three trees and more snow.


The inside is made of plain sage green linen without decoration and I put a thin layer of padding inside so that the tools can be inserted directly into the case without having to add another layer.


Now I just have to make the tools!

Tuesday 10 June 2014

Trees and Cardinal Magnetic Needle Rests

I've made two magnetic needle rests to add to the set. They are too small to feature Bears so I've used snow laden trees and a Cardinal. 


The smallest magnetic needle rest features a tiny tree. I've pictured it with a 20p coin so that you can get a better idea of the size. It is designed to sit on my magnetic pattern frame without obscuring the pattern. 


The second is larger and features a cardinal on a fir tree branch. 


Monday 9 June 2014

More Prarie Finishes

I stitched these Prarie miniatures over Easter and i've now finished them as tiny lavender sachets.